The Enterprise Version allows unlimited simultaneous access to a shared database in a disk file or on a server.
If you select to use a MS SQL or Oracle database, create an instance of the database on your enterprise database server. If you select to use the database in a disk file instead, simply set up a shared network folder with read and write access for each user of the Line Database file.
You can install the Enterprise Version program on any number of computers in your organization.
CREATE A DATABASE INSTANCE ON THE SERVER.
1. Using the Oracle or MS SQL Server software, create a database instance. Create an user account with:
User Name: ASPENLDB.
Note: Instead of ASPENLDB, you can use any other valid Oracle or MS SQL user name. You must enter the same name in the data link file in the step 4 below.
2. Grant this account create, drop, alter, insert delete, update access to the data.
3. Make the database instance the default database of this account.
NOTE: The ASPEN Line Database software has its own access-control logic. You can use the Line Database Administration functions to add and remove users and to assign their access rights to the different data forms. When a user accesses the Line Database, the program presents the user a log-in dialog box with a “User name” field and a “User password” field. The program will admit the user only if the name and password match one of the accounts that you have entered into the Line Database Administration function. It is important to distinguish between (1) the user name and password you create with the ASPEN Line Database Administration function and (2) the account name and password you created with Oracle or SQL Server software at the beginning of this step.
INSTALL THE LINE DATABASE PROGRAM ON A DESKOP COMPUTER
3. Insert the program CD into your CD-ROM drive.
4. The setup program will start automatically.
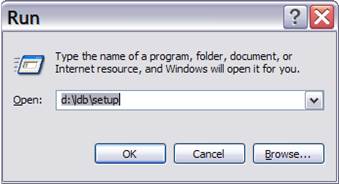
(If the setup program did not start automatically, on your Windows desktop, click on Start, then on Run. The following dialog box will appear.
Enter d:\LDB\SETUP in the edit box, where D: is the name of your CD-ROM drive. Click on OK. The installation wizard will start.)
5. Follow the instructions on the screen.
The setup program will ask you for a company name and a company code. You can find the company name and code in the letter that accompanied the initial shipment of the program CD. Please write to support@aspeninc.com if you need any assistance.
The setup program will ask you for a directory for the program files. We suggest you specify a directory in a network drive where users will have read/write privileges.
Linedb.exe The Line Database executable file.
Lcdll08.dll The line constants calculation library.
Manldb.chm The Line Database help file.
Install.log A log file from the setup program. Do not erase.
Demo Folder with program demo.
Sample_English60.ald A sample database for 60 Hz and English units of length.
Sample_Metric60.ald A sample database for 60 Hz and metric units of length.
Empty.ald An empty starter database with no wire data.
Empty_English60.ald A starter database for 60 Hz and English units of length. This database is empty except for approximately 650 commonly used wire types (See APPENDIX A: WIRE TYPE DATA).
Empty_Metric60.ald A starter database for 60 Hz and metric units of length. This database is empty except for approximately 650 commonly used wire types (See APPENDIX A: WIRE TYPE DATA).
LDBUtilV3.exe (*) The Line Database utility program.
UDLEditor.exe (*) The UDL file editor program
DBX.exe (*) The Password Encoder program
(*) The setup will copy these files to the selected program file directory only when you select the check box “Administration component” in the Installation Options page of the Installation wizard.
The installation program will create a Windows program group called "ASPEN Line Database V3" under Windows desktop’s Start | All Programs | ASPEN menu.
6. If your program is shipped with a program key and you are the database administrator, please plug the key onto the USB port of your PC.
7. If you are installing the Line Database for the very first time, please see APPENDIX E: GETTING STARTED NOTES.
ESTABLISH A CLIENT CONNECTION TO THE LINE DATABASE SERVER.
This step must be performed on each computer that will utilize the Line Database software.
First, ensure there is a connection between your machine and the database server. You can most likely omit this step if you are already running database applications with Oracle or MS SQL Server on this workstation.
8. Execute the Oracle Client or SQL Server setup program provided by Oracle or Microsoft (ASPEN does not provide this program) on the client computer and select Client Installation.
In Oracle, you must set up Net Configuration Assistant for Oracle 12g or newer for a new connection to the Line Database. In the following, we assume that you named this connection ASPENLDB.
For MS SQL Server, the client setup is included with the MS SQL software setup program.
9. (Optional) Test the connection.
Follow directions given by Oracle or Microsoft to test the connection.
NOTE: We chose to give just a vague outline on how to setup the database in steps 1 and 2, because the procedure varies widely from version to version, and from installation to installation. Please consult your in-house database expert if you have any questions.
Line Database software utilizes Microsoft Data Link File (with UDL extension) to connect to the Line Database on Oracle or MS SQL server. Each data link file contains all the information the software needs to access a Line Database instance. You can use multiple Data Link files to accommodate different instances of the Line Database.
The following will show you how to edit a data link file and test it.
NOTE: You can copy the UDL files you created and tested on one machine to access the Line Database from another LDB machines, provided that all of these machines are in the same LAN.
There is a sample data link file LineDB_X.UDL (X is ‘o’ for Oracle, and ‘m’ for MS SQL Server) in the default directory where you installed Line Database application. Before continue to the steps below, you will have to copy this file to a read-write folder where you can modify the UDL file content. You can also rename it to any name that is related to your database. The instructions below will show you how to customize and test this data link file for an instance of the Client/Server Database.
10.
Using the Windows Explorer, run the program
C:\Program Files
(x86)\ASPEN\LineDBV3\UDLEditor.exe.
This program window will appear.
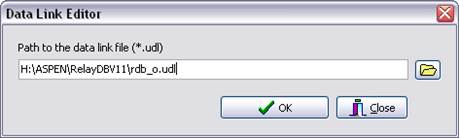
Enter full path name for the data link file you wish to edit and click OK.
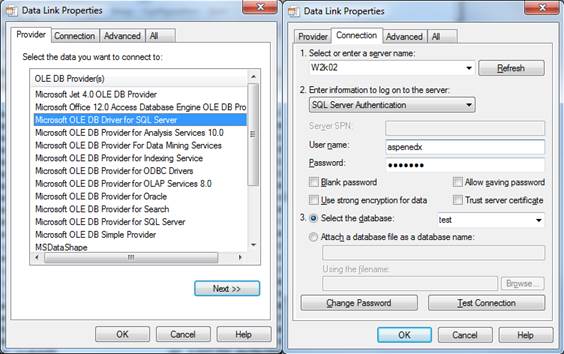
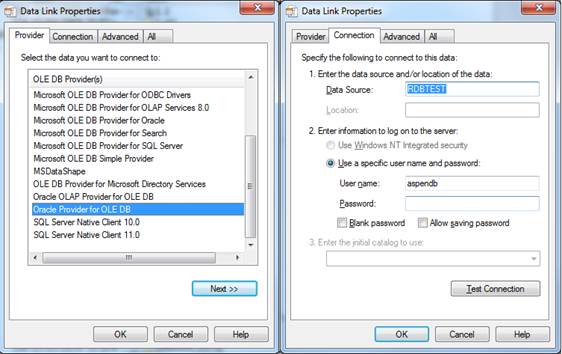
11. Enter provider information: In the Provider tab select
- For MS SQL database server: "Microsoft OLE DB Provider For SQL server" or “Microsoft OLE DB Driver For SQL server" as shown in the following picture
- For Oracle database server: "Oracle Provider for OLE DB" as shown in the following picture
If you need more data link files for other database instances, simply copy the file LDB_X.UDL and edit it as shown in step (b).
12. Test Connection:
Enter the database password and press the “Test Connection” button near the bottom of the dialog box.
A message box saying, “Test connection succeeded” will appear if everything is working. It is very important that you pass this test because the Line Database will use the same mechanism to access the database.
13. Erase the password and then press the “OK” button to save the setting. You must NOT store the password in the data link file. The Line Database will get the database password from the encoded password file.
STORE THE DATABASE-ACCOUNT PASSWORD IN AN ENCODED FILE.
14. Run the ASPEN Line Database Password Encoder, as follows.
Using the Windows Explorer, run the program
C:\Program Files\ASPEN\LineDBV3\dbx.exe
In the program dialog box, type in the password you chose when you created the database instance in step 1a. Press OK.
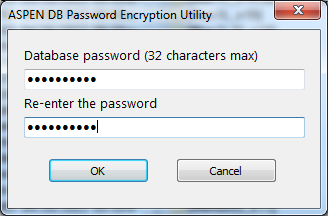
The program will pop up a standard save-file dialog box to ask you to name the new password file.
The name of the DAT file must be the same as the data link (UDL) file that you plan to use to access the Line Database. For example, if the name of the data link file is ABCD.UDL, then the password file must be named ABCD.DAT.
You must store this DAT file in the same directory as the associated UDL file.
By now you should have:
•Created a Line Database instance at the Oracle or SQL-Server Database Server.
•Created a database user account and created a password file with extension DAT.
•Created a data link file for the Line Database instance.
•Made your machine an Oracle or SQL Server Client.
•Created and tested the data link file for the newly created database on your machine.
Run the Line Database Utility program LDBUtilV3.exe to create the required tables.
Note: To complete this step make sure that the database user name stored in the data link file have sufficient privileges to ‘Create table’ and 'Modify table' in the database instance.
15. Using the Windows Explorer, run the program
C:\Program Files\ASPEN\LineDBV3\LDBUtilV3.exe.
This program window will appear.
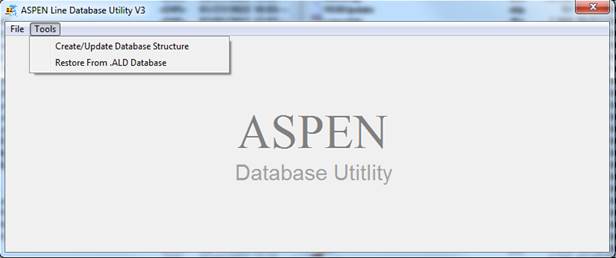
16. Select Tools | Create/Update Database Structure: This window will appear
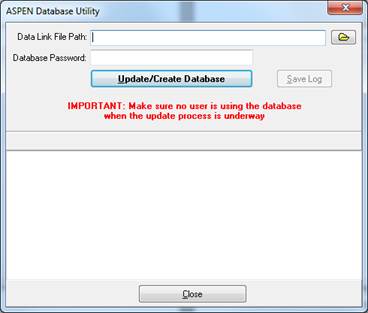
17. Enter the full path name for the data link file created in step 5 in the Data Link File Path edit box.
18. Enter the database password.
This is password you chose for the default user when you created the database instance in Section 2.2, step 1a.
19. Click on “Create/Update Database” button.
The program will open the database instance to prepare data tables and required parameters.
The update progress will be displayed in the edit box. When the execution is complete you can save the log content to disk by clicking on the Save Log button.
20. When the Database update is completed, click on Close to exit the program.
RESTORE THE DATA FROM AN EXISTING LINE DATABASE FILE (*.ALD)
Follow the steps below to restore the data from an existing ALD file to the Line Database on the server:
21. Using the Windows Explorer, run the program
C:\Program Files\ASPEN\LineDBV3\LDBUtilV3.exe.
This program window will appear.
22. Select Tools | Restore From ADL Database: This window will appear
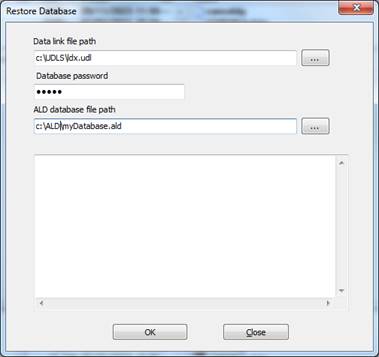
23. Enter the full path name for the data link file Data Link File Path edit box.
24. Enter the database password.
This is password you chose for the default user when you created the database instance.
25. Enter the full path name for the ALD database file
26. Click on OK and follow the instructions to restore the data.
Note: If you choose to restore the data from an ALD file created in a previous Line Database version, the program will need to upgrade the ALD file structure before the restore operation can commence. This step will be perform in a copy the select ALD file that the program will automatically create in the local Windows TEMP folder. The original ALD file will be kept unmodified.
SETUP LINE DATABASE SERVE CONNECTION ON ADDITIONAL CLIENT COMPUTER
By now you should have completed the setup on a single Line Database machine successfully. Perform the following on each Line Database client in the company LAN where you want to enable Line Database operations:
27. Establish a client connection to the database server.
28. Copy the datalink file, and corresponding password file to a folder you can access from this machine.