The Tools | User Management command lets the administrator add, remove reset password, assign access privileges and to perform other user related tasks. This command is available only when you login as administrator in the Line Database Enterprise version.
TO DISPLAY USER LIST:
1. Click on "User" located on the toolbar to open the 'User's form.
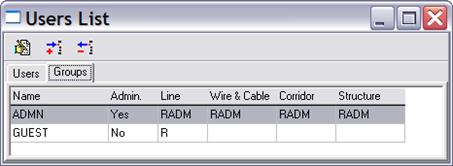
The Users List Dialog will appear. The form has two pages: Users and Groups.
The Users page shows list of users with login ID and other user information. It also indicates whether a user has “administrator” privilege, which is required to run this Administration Program. User group membership, status, privileges to edit setting and test template and privilege to setup database reports are displayed as well. Initially, the Users Form contains only one account: ‘ADMN.’
Every user in the database must be assigned to at least one user group. The Groups page of the Users form contains a table of user groups that shows a summary of user privileges in the group on a form-by-form basis. The Line Database does not let user open, view and change information in data forms unless the user belongs to a group with the necessary privileges. Specifically, for each of the data forms, you can grant a one or more of the following privileges:
A: Add a new object. The user can enter data for the new object immediately after it is created. The user can also modify the data during the session.
D: Delete an existing object.
M: Modify the data.
R: Open the data form for viewing.
1. Click on the Group tab:
List of existing user groups will appear.
2. Press the Add button: 
A blank Edit User Group form will appear.
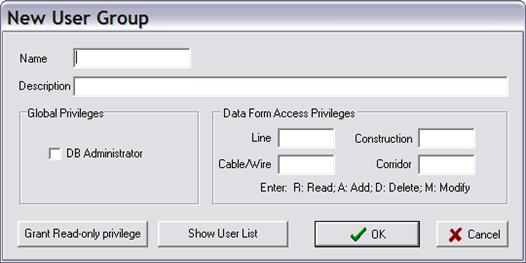
3. Enter group name and description.
4. Assign privileges for different data forms for users in this group
Mark the check box “DB Administrator” to make users of this group database administrator and to grant maximum privileges for all the forms.
Press the Grant Read-Only Privilege button to grant users in this group read-only privileges for all the forms.
The following are the general rules for granting privileges to the data forms:
Leave an edit box blank if want to prevent the user from opening that form. Enter R if you wish to grant the user Read Only access. Otherwise, enter one or more of the following letters, ‘A’, ‘M’ and ‘D’ in the edit box for Add, Modify and Delete privileges, respectively.
5. Assign global privileges for users in this group
Mark the “DB Administrator” checkbox to make users in this group database administrator. All the other checkboxes below will be marked automatically.
6. Press OK to close the dialog box.
TO ADD AN USER ACCOUNT
1. Click on the Users tab:
List of existing user groups will appear.
2. Click on the Add button:
A New User form will appear.
Enter the user’s login name and password.
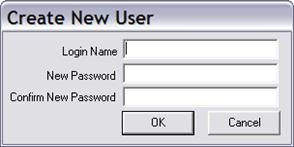
The login name must be unique, so that the program can tell one user apart from another. The password is case sensitive. The login name is not.
Press OK.
An Edit User Form will appear.
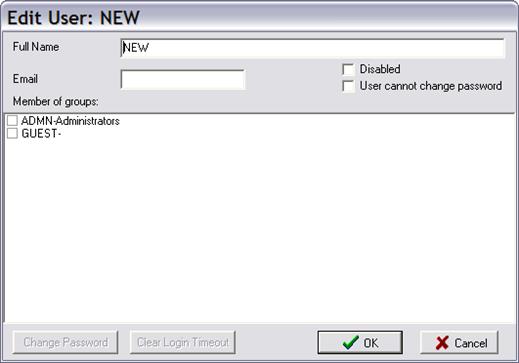
3. Enter user full name and other relevant description such as telephone extension.
4. Enter user’s email address.
5. Assign user group membership
Select check box in front of group name in the list to assign user to this group.
6. Press OK to close the dialog box.
TO DELETE AND EDIT A USER ACCOUNT
1. To delete a user, first
select a row in the grid. Then press the Delete button: 
The user account will be removed from the Users Form.
2.
To edit an existing user first select it by clicking on it. Then, click on
the Edit button  and make any
necessary changes. Press OK to close the form.
and make any
necessary changes. Press OK to close the form.
3. Press OK to close the dialog box.
Main Window
TOOLS MENU